スイッチ間を接続するときは、必ず番号の異なるスタックポート同士を接続するようにしてください。
たとえばスイッチA、Bのポート25と26をスタックポートに設定している場合、スイッチAのポート25をスイッチBのポート26に、スイッチBのポート25をスイッチAのポート26に接続します。
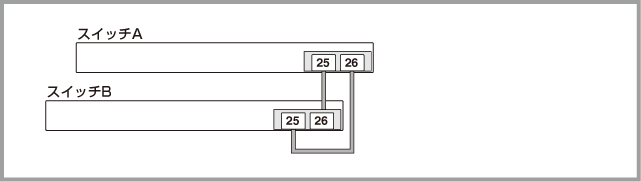
Noteスタックリンクに冗長性を持たせ、耐障害性を高めるため、通常はスタックケーブルをリング状に接続することをおすすめします。これ以降の説明はすべて、リング状に接続していることを前提としています。
[index] CentreCOM x240シリーズ コマンドリファレンス 5.5.4
Note
- VCS機能はデフォルト無効です。スタックメンバーの初期設定時に有効化してください。
- デフォルトではスタックポートが設定されていないため、初期設定時に「スタックポートとして使用するポートの指定」を参照し、スタックポートとして使うポートを指定してください。
- スタックモジュール間は直結してください。
スタックモジュール間に他のネットワーク機器を接続することはできません。
- VCSグループ内では、すべてのスタックリンクの帯域幅、および、メンバー間で使用するポートの数を統一する必要があります。
- 各スタックリンクは同一速度・同一メディアタイプのポートで構成してください。
- スタックポートは各メンバー1ポートずつ(スタックリンク 1本)でも動作しますが、スタックリンクに冗長性をもたせ、耐障害性を高めることと、帯域確保を目的として通常は2ポートずつ使ってスタックリンクをリング状に接続することを推奨します。
- スタックモジュールはホットスワップ対応のため、取り付け・取りはずしの際に、本体の電源を切る必要はありません。異なる種類(型番)のモジュールへのホットスワップも可能です。
NoteスレーブメンバーがVCSグループに加入しようとしているときにコンフィグを変更すると、再加入したスレーブメンバーにコンフィグが反映されないことがあります。スレーブメンバーが加入中に設定の変更はしないでください。
| コンフィグファイル | ○ ※1 | |
| スクリプトファイル | ○ | |
| テキストファイル | × ※2 | |
| HTMLファイル | × ※2 | |
| cssファイル | × ※2 | |
| GIFファイル | × ※2 | |
| Javaアプレットファイル | ○ | |
| リモートSSHユーザーの公開鍵 | × ※2 | |
| ルートCA証明書(ローカルRadius) | ○ | |
| ユーザ証明書(ローカルRadius) | ○ | |
| ローカルユーザパスワードファイル | ○ | |
| DHCPリース関連ファイル | ○ | |
| DHCPリースバックアップファイル | ○ | |
| GUIファイル | ○ | |
| GUIファイル | ○ |
| Force-Authorized | Authenticated |
| Force-Unauthorized | Down |
Failed to send ATL CPG msg (udt_data 0) - result -23この場合、スタックメンバーに一部のハードウェアパケットフィルターが適用されていないため、ハードウェアアクセスリスト(シーケンス番号対応)などを利用して、各スイッチポートに適用するaccess-groupコマンドの行数を減らしてください。
Note本体カッパーポートをスタックポートとして使うこともできます。詳しくは「スイッチポートをスタックポートとして使用する」をご覧ください。
awplus> enable ↓
awplus#
awplus# show boot ↓
Boot configuration
--------------------------------------------------------------------------------
Current software   : x240-5.5.4-1.2.rel
Current boot image : flash:/x240-5.5.4-1.2.rel (file exists)
Backup  boot image : Not set
Default boot config: flash:/default.cfg
Current boot config: flash:/default.cfg (file exists)
Backup boot config : Not set
Autoboot status    : disabled
awplus# copy startup-config StandaloneConfig.cfg ↓
Copying..
Successful operation
awplus# configure terminal ↓
awplus(config)# stack enable ↓
% Automatically enabling 'stack virtual-mac' to minimize disruption from failovers.
% Please check that the new MAC 0000.cd37.03b0 is unique within the network.
% Save the config and restart the system for this change to take effect.
NoteバーチャルMACアドレス機能は、stack enableコマンドでVCS機能を有効化すると自動的に有効化されます。stack virtual-macコマンドをno形式で実行することにより無効化もできますが、VCS使用時は必ずバーチャルMACアドレス機能を有効にした状態で運用してください。無効状態での運用はサポート対象外となります。
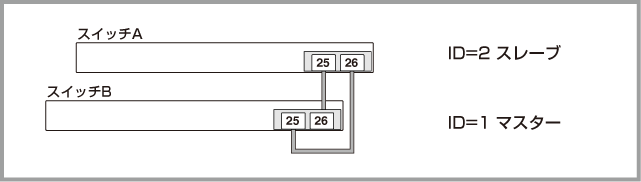
awplus(config)# stack 1 renumber 2 ↓
awplus(config)# end ↓
awplus# copy running-config startup-config ↓
awplus# show boot ↓
Boot configuration
--------------------------------------------------------------------------------
Current software   : x240-5.5.4-1.2.rel
Current boot image : flash:/x240-5.5.4-1.2.rel (file exists)
Backup  boot image : Not set
Default boot config: flash:/default.cfg
Current boot config: flash:/default.cfg (file exists)
Backup boot config : Not set
Autoboot status    : disabled
Noteフィーチャーライセンスが適用された機器でVCS 構成を利用する場合は、各VCS メンバーに同一の「License issue date」を持つフィーチャーライセンスがインストールされている必要があります。各VCS メンバー間でフィーチャーライセンスの「License issue date」が異なる場合には、ライセンスパスワードを更新する必要がありますので、弊社窓口までご連絡ください。フィーチャーライセンスの「License issue date」は、show licenseコマンドでご確認いただけます。
| 本体カッパーポート (10/100/1000/2.5G/5GBASE-Tポート) |
1 ~ 8 | 2 | AT-x240-10GTXm、AT-x240-10GHXm |
| 1 ~ 24 | 2 | AT-x240-26GTXm、AT-x240-26GHXm | |
| SFP/SFP+スロット | 9 ~ 10 | 2 | AT-x240-10GTXm、AT-x240-10GHXm |
| 25 ~ 26 | 2 | AT-x240-26GTXm、AT-x240-26GHXm |
Noteスタック接続に使用できるポート、モジュール、ケーブルについては、基本仕様をご参照ください。
Note以下の説明では、すでにスタートアップコンフィグの確認・バックアップ・消去、ファームウェアバージョン、フィーチャーライセンスの確認と統一は完了しているものとします。
awplus> enable ↓
awplus# configure terminal ↓
Enter configuration commands, one per line.  End with CNTL/Z.
awplus(config)#
Noteスタックメンバー分の設定が必要です。
awplus(config)# switch 1 provision x240-26 ↓
awplus(config)# switch 2 provision x240-26 ↓
awplus(config)# interface port1.0.25,port1.0.26 ↓
awplus(config-if)# stackport ↓
% Save the config and restart the system for this change to take effect.
awplus(config-if)# exit ↓

awplus(config)# interface port2.0.25,port2.0.26 ↓
awplus(config-if)# stackport ↓
% Save the config and restart the system for this change to take effect.
awplus(config-if)# end ↓
awplus# write ↓
Building configuration...
[OK]
Notestackportコマンドによる設定は、設定を保存し、機器を再起動するまで有効になりません。
NoteスタックポートはSFP/SFP+スロット×2ポートもしくは10/100/1000/2.5G/5GBASE-Tポート×2ポートで構成してください。
NoteSFP/SFP+スロットを使用する場合は同一のスタックモジュールを使用してください。
Noteなお、以降の説明では原則としてスタックモジュールを使用するものと仮定しています。任意のポートを使用する場合は、これらの差異を念頭に置きつつ、適宜説明を読み替えてください。
Note表示される内容は機種やファームウェアのバージョンによって異なります。下記はあくまでも一例ですので、ご了承ください。
awplus# show stack detail ↓
Virtual Chassis Stacking detailed information
...
Stack member 1:
------------------------------------------------------------------
...
Stack port1.0.x status                  Learnt neighbor 2
Stack port1.0.y status                  Learnt neighbor 2

Stack member 2:
------------------------------------------------------------------
...
Stack port2.0.X status                  Learnt neighbor 1
Stack port2.0.Y status                  Learnt neighbor 1
Note表示される内容は機種やファームウェアのバージョンによって異なります。下記はあくまでも一例ですので、ご了承ください。
awplus# show interface ↓
...
Interface port1.0.x
...
  Hardware is Stackport Ethernet, address is e01a.ea46.0554
...

Interface port1.0.y
...
  Hardware is Stackport Ethernet, address is e01a.ea46.0554
...
Note表示される内容は機種やファームウェアのバージョンによって異なります。下記はあくまでも一例ですので、ご了承ください。
awplus# show interface brief ↓
Interface             Status          Protocol
...
port1.0.x             admin up        stackport running
port1.0.y             admin up        stackport running
...
Note表示される内容は機種やファームウェアのバージョンによって異なります。下記はあくまでも一例ですので、ご了承ください。
awplus> show interface status ↓
Port       Name               Status           Vlan Duplex   Speed Type
...
port1.0.x                     notconnect   stackport auto      auto not present
port1.0.y                     notconnect   stackport auto      auto not present
...
port2.0.X                     notconnect   stackport auto      auto 10GBASE-T
port2.0.Y                     notconnect   stackport auto      auto 10GBASE-T
...
Note表示される内容は機種やファームウェアのバージョンによって異なります。下記はあくまでも一例ですので、ご了承ください。
awplus# show running-config interface ↓
...
!
interface port1.0.x,1.0.y
 stackport
!
...
Noteスタックリンクに冗長性を持たせ、耐障害性を高めるため、通常はスタックケーブルをリング状に接続することをおすすめします。これ以降の説明はすべて、リング状に接続していることを前提としています。
awplus> enable ↓
awplus#
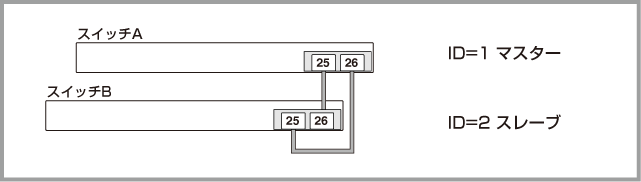
awplus# configure terminal ↓
Enter configuration commands, one per line.  End with CNTL/Z.
awplus(config)# stack 2 renumber cascade ↓
Any existing interface configuration may no longer be valid
Are you sure you want to renumber and reboot the entire stack? (y/n): y ↓

awplus# configure terminal ↓
Enter configuration commands, one per line.  End with CNTL/Z.
awplus(config)# hostname vcg ↓
vcg(config)# stack 1 priority 64 ↓
vcg(config)# stack virtual-mac ↓
vcg(config)# stack virtual-chassis-id 127 ↓
Note同一ネットワーク上に複数のVCSグループが存在するときは、該当するVCSグループ間でバーチャルシャーシID(stack virtual-chassis-id)が重複しないよう注意して設定してください。バーチャルシャーシIDは、show stackコマンドをdetailオプション付きで実行したときに表示される「Virtual Chassis ID」欄で確認できます。
NoteバーチャルMACアドレス機能は、stack enableコマンドでVCS機能を有効化すると自動的に有効化されます。stack virtual-macコマンドをno形式で実行することにより無効化もできますが、VCS使用時は必ずバーチャルMACアドレス機能を有効にした状態で運用してください。無効状態での運用はサポート対象外となります。
vcg(config)# stack management subnet 172.21.255.64 ↓
vcg(config)# stack management vlan 4000 ↓
vcg(config)# end ↓
vcg# show running-config ↓
...(表示されるコンフィグに問題がないことを確認) ...
vcg# copy running-config startup-config ↓
Building configuration...
[OK]
Synchronizing file across the stack, please wait..
File synchronization with stack member-1 successfully completed
[DONE]
vcg# reload ↓
Are you sure you want to reboot the whole stack? (y/n): y ↓
vcg> enable ↓
vcg# configure terminal ↓
Enter configuration commands, one per line.  End with CNTL/Z.
vcg(config)# stack resiliencylink vlan4001 ↓
vcg(config)# interface port1.0.1-1.0.2,port2.0.1-2.0.2 ↓
vcg(config-if)# switchport resiliencylink ↓
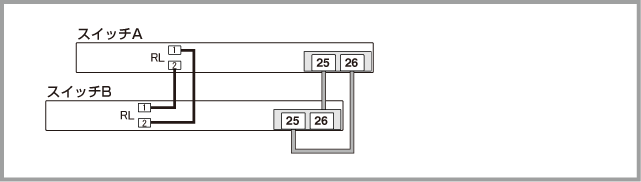
Noteレジリエンシーリンクに冗長性を持たせ、耐障害性を高めるため、通常は各メンバー2ポートずつをレジリエンシーリンク用に設定し、イーサネットケーブルをリング状に接続することをおすすめします。ただし、メンバー2台でVCSグループを構成するときは、各メンバー1ポートずつをレジリエンシーリンク用に設定して、1本のケーブルで接続してもかまいません。なお、これ以降の説明はすべて、リング状に接続していることを前提としています。
vcg(config)# end ↓
vcg# show running-config ↓
...(表示されるコンフィグに問題がないことを確認) ...
vcg# copy running-config startup-config ↓
Building configuration...
[OK]
Synchronizing file across the stack, please wait..
File synchronization with stack member-2 successfully completed
[DONE]
vcg#
(C) 2023 - 2024 アライドテレシスホールディングス株式会社
PN: 613-003248 Rev.F